Description of monitor tests
Welcome
monitest is a service for testing your computer monitor or mobile device display. With the help of test screens, you can easily adjust your monitor settings to get the best image quality. A number of tests will help you evaluate the image quality of your monitor. Even from the first test screens, you can calibrate your monitor by adjusting the brightness, contrast, synchronization phase, sharpness, and gamma correction of the monitor.
The tests are best viewed in dim or dark ambient light and in full-screen mode. When you launch the tests, you will be automatically prompted to switch to full-screen mode. When you move the mouse pointer, the test control panel will appear at the bottom of the screen. Using the controls on the panel, you can select the test you need, rotate the slide (if the test allows it), return to the main page, or turn off full-screen mode. On the left and right sides of the screen, when you move the mouse, buttons for switching between tests are displayed. For convenience, the controls disappear from the screen when the mouse pointer does not move. In addition, hot keys are provided. To switch between test screens, use the "Left", "Right", or "Space" keys, or the mouse wheel. To rotate slides - "Up" and "Down", to exit the test - "Esc".
If you have any color management systems installed in your operating system or additional video card correction software, it is recommended to disable them first. First, you need to make adjustments to your monitor settings so that its characteristics are as close to ideal as possible, and only then use any color management software to compensate for any small possible deviations or shortcomings.
Below is a description of what and how you can check using monitest service tests, what you should pay attention to, and other useful tips.
Color rendering

This classic pattern is used to check the settings of the main colors and shades. Nowadays, there are usually no special problems with color rendering (especially on LCD monitors), so you most likely do not even need to change these settings. This test can be used to check that the monitor displays colors correctly without any artifacts. If your monitor supports filters (or has color filtering software), then you can use such filters to check that the monitor clearly renders colors without impurities (i.e., for example, when using a red filter, the red stripe should not change the hue).
Defective pixels


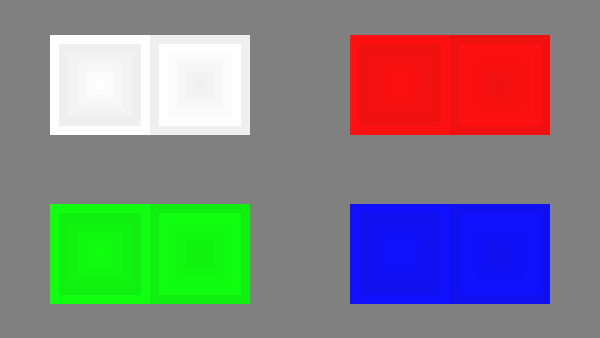
Modern monitors use the RGB color model (an abbreviation of the English words Red, Green, Blue — red, green, blue) for color reproduction. Each pixel on the screen consists of three channels. Mixing these three colors in different intensities produces different colors, while mixing the same intensity produces shades of gray. The color rendering test series includes single-color template screens. These tests use only one specific color channel. Separately, the red screen, separately, the green screen, and separately, the blue screen.
These tests, in addition to the channel color fullness, allow you to check for broken pixels or, as they are also called, dead pixels. To check for broken pixels, you need to carefully view the entire screen on a single-color test screen. There should be no black dots on it. You need to check each channel, since each pixel consists of three channels. Therefore, it is not at all necessary that if everything is fine on one channel, then everything will be fine on the other. If you find a black dot on one of these tests, then you have found a broken pixel. Certainly, the presence of a defect even in one of the pixel channels will lead to distortion of color reproduction in this pixel (point). The presence of several dead pixels is normal for old monitors, but a new one should not have such defects.This series also includes color channel mixing tests: yellow (red+green), purple (red+blue), cyan (green+blue), and white (red+green+blue).
Gradients


This series of tests presents screen patterns with smooth gradients. All gradients should be displayed smoothly, without any stripes, lines or abrupt color changes. Stripes appear when the monitor is unable to correctly reproduce true colors and smooth transitions. A good monitor will display a completely smooth transition.
Flickering


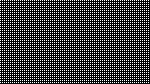

Many VGA monitors require adjustment of the so-called clock/phase parameter. These test images are best viewed in full-screen mode. At a large distance from the monitor, they should appear gray. Up close, a fine pattern of alternating contrasting pixels (black and white) should be clearly visible.
If the synchronization is not set up correctly, the images flicker or create the impression of "running pixels". Or if the images look solid gray (no dots are visible even when looking closely) or there are black and white stripes (vertical or curved), then adjustments are also necessary.
Most monitors have a feature that automatically adjusts this setting. It is usually called "Auto" or "AutoSet". Depending on the type of monitor, there may be manual adjustment options.
Sharpness
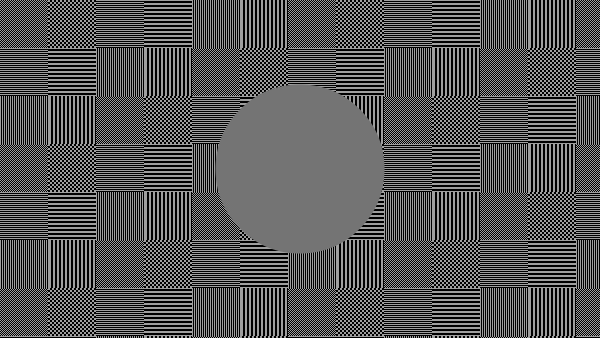
Sharpness is very important. Sharpness is responsible for the level of clarity of the border between light and dark areas. For example, if you think that the letters of the text are blurred, then most likely the sharpness level is insufficient. By setting a certain sharpness level on the display, you can get a picture or text that is pleasing to the eye. But excessive sharpness is just as bad as insufficient sharpness.
Unlike brightness, contrast, color, and hue, there is no "ideal" level of sharpness. Because the perception and optimal value of image sharpness depends, at least in part, on a number of factors, including the display method, the size of the screen, and how far you typically sit from the screen.
In the test example above, if the sharpness is sufficient, you should clearly see small checkerboard patterns. If the sharpness is insufficient, some of the squares will merge into a solid gray color. The central circle should stand out clearly.
On the other test, you should see clear rectangles and lines without blurry edges, halos, or other artifacts. Diagonal lines should also be straight.
Contrast and brightness
In this series of tests, you should see clear boundaries between the stripes and squares in the images. If some areas merge and become the same color or are not visible against the background at all, then you need to adjust the brightness and contrast. On a good monitor, you should see equal brightness levels in the entire range presented in the tests and in all colors.
Zonal brightness
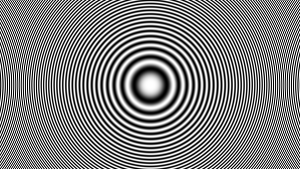
This test is a good way to check the overall brightness reproduction level, and not a bad template for checking sharpness. The center of the screen should look smooth and clean. Further from the center, closer to the edges, the contours should become sharper and sharper and less smooth. Closer to the edges of the screen, imaginary false concentric circles may appear. If these contours are egg-shaped or oval, then something is wrong. In the corners of the screen, a small, almost imperceptible drop in brightness is possible. If the drop in brightness is large or everything merges, then it is not so good.
Geometry and Grids
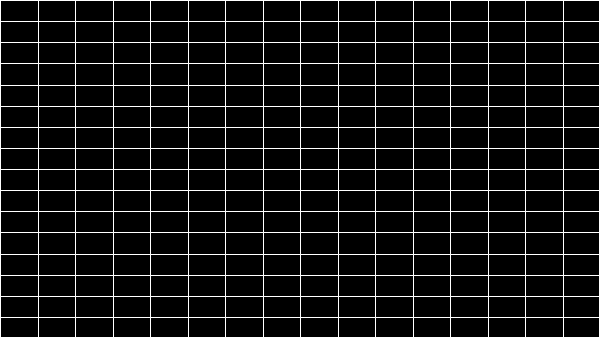
These tests are designed to check the correct geometry and fit of the image reproduced by the monitor.
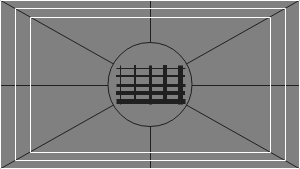
Image clipping
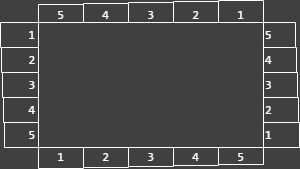
Not every display actually shows you every pixel that the video card sends to the monitor. This test will show you how part of the image is missing. If the monitor is set up correctly, you should see a white line on the outer edge of all the numbered rectangles around the edge of the screen. If some rectangles are missing the outer white line at the edge of the screen, this means that the edge of the image is being cut off. The number on the cut-off rectangle shows how many pixels are missing on that edge of the screen.
Format 16:9
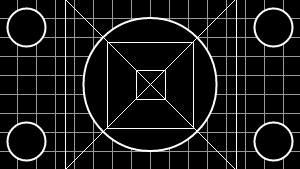
The test example above is designed to check widescreen displays with an aspect ratio of 16:9. Here you should see a grid of 16 identical squares horizontally and 9 identical squares vertically. In the corners, you should see circles of the correct shape. If you do not see them or they are cut off or distorted, then your monitor either does not support the corresponding mode, or you need to adjust the image scaling, which can be found in the display's service menu.